Android App Reverse Engineering 101

Learn to reverse engineer Android applications!
Table of Contents
- Introduction
- Android Application Fundamentals
- Getting Started with Reversing Android Apps
- Reverse Engineering Android Apps - DEX Bytecode
- Reverse Engineering Android Apps - Native Libraries
- Reverse Engineering Android Apps - Obfuscation
- Conclusion
5. Reverse Engineering Android Apps - Native Libraries
Android applications can contain compiled, native libraries. Native libraries are code that the developer wrote and then compiled for a specific computer architecture. Most often, this means code that is written in C or C++. The benign, or legitimate, reasons a developer may do this is for mathematically intensive or time sensitive operations, such as graphics libraries. Malware developers have begun moving to native code because reverse engineering compiled binaries tends to be a less common skillset than analyzing DEX bytecode. This is largely due to DEX bytecode can be decompiled to Java whereas native, compiled code, often must be analyzed as assembly.
Goal
The goal of this section is not to teach you assembly (ASM) or how to reverse engineer compiled code more generally, but instead how to apply the more general binary reverse engineering skills, specifically to Android. Because the goal of this workshop is not to teach you the ASM architectures, all exercises will include an ARM and an x86 version of the library to be analyzed so that each person can choose the architecture that they are more comfortable with.
Learning ARM Assembly
If you don’t have previous binary reverse engineering/ assembly experience, here are some suggested resources. Most Android devices run on ARM, but all exercises in this workshop also include an x86 version of the library.
To learn and/or review ARM assembly, I highly suggest the ARM Assembly Basics from Azeria Labs.
Introduction to the Java Native Interface (JNI)
The Java Native Interface (JNI) allows developers to declare Java methods that are implemented in native code (usually compiled C/C++). JNI interface is not Android-specific, but is available more generally to Java applications that run on different platforms.
The Android Native Development Kit (NDK) is the Android-specific toolset on top of JNI. According to the docs:
In Android, the Native Development Kit (NDK) is a toolset that permits developers to write C and C++ code for their Android apps.
Together, JNI and NDK allow Android developers to implement some of their app’s functionality in native code. The Java (or Kotlin) code will call a Java-declared native method which is implemented in the compiled, native library.
References
Oracle JNI Docs
- JNI Specification
- JNI Functions <– I always have this one open and refer to it while reversing Android native libraries
Android JNI & NDK References
- Android JNI Tips <– Highly suggest reading the “Native Libraries” section to start
- Getting Started with the NDK <– This is guidance for how developers develop native libraries and understanding how things are built, makes it easier to reverse.
Target of Analysis - Android Native Libraries
For this section, we are focusing on how to reverse engineer app functionality that has been implemented in Android native libraries. When we say Android native libraries, what do we mean?
Android native libraries are included in APKs as .so, shared object libraries, in the ELF file format. If you have analyzed Linux binaries previously, it’s the same format.
These libraries by default are included in the APK at the file path /lib/<cpu>/lib<name>.so. This is the default path, but developers could also choose to include the native library in /assets/<custom_name> if they so choose. More often, we are seeing malware developers choose to include native libraries in paths other than /lib and using different file extensions to attempt to “hide” the presence of the native library.
Because native code is compiled for specific CPUs, if a developer wants their app to run on more than 1 type of hardware, they have to include each of those versions of the compiled, native library in the application. The default path mentioned above, includes a directory for each cpu type officially supported by Android.
| CPU | Native Library Path |
|---|---|
| “generic” 32-bit ARM | lib/armeabi/libcalc.so |
| x86 | lib/x86/libcalc.so |
| x64 | lib/x86_64/libcalc.so |
| ARMv7 | lib/armeabi-v7a/libcalc.so |
| ARM64 | lib/arm64-v8a/libcalc.so |
Loading the Library
Before an Android app can call and execute any code that is implemented in a native library, the application (Java code) must load the library into memory. There are two different API calls that will do this:
System.loadLibrary("calc")
or
System.load("lib/armeabi/libcalc.so")
The difference between the two api calls is that loadLibrary only take takes the library short name as an argument (ie. libcalc.so = “calc” & libinit.so = “init”) and the system will correctly determine the architecture it’s currently running on and thus the correct file to use. On the other hand, load requires the full path to the library. This means that the app developer has to determine the architecture and thus the correct library file to load themselves.
When either of these two (loadLibrary or load) APIs are called by the Java code, the native library that is passed as an argument executes its JNI_OnLoad if it was implemented in the native library.
To reiterate, before executing any native methods, the native library has to be loaded by calling System.loadLibrary or System.load in the Java code. When either of these 2 APIs is executed, the JNI_OnLoad function in the native library is also executed.
The Java to Native Code Connection
In order to execute a function from the native library, there must be a Java-declared native method that the Java code can call. When this Java-declared native method is called, the “paired” native function from the native library (ELF/.so) is executed.
A Java-declared native method appears in the Java code as below. It appears like any other Java method, except it includes the native keyword and has no code in its implementation, because its code is actually in the compiled, native library.
public native String doThingsInNativeLibrary(int var0);
To call this native method, the Java code would call it like any other Java method. However, in the backend, the JNI and NDK would instead execute the corresponding function in the native library. To do this, it must know the pairing between a Java-declared native method with a function in the native library.
There are 2 different ways to do this pairing, or linking:
- Dynamic Linking using JNI Native Method Name Resolving, or
- Static Linking using the
RegisterNativesAPI call
Dynamic Linking
In order to link, or pair, the Java declared native method and the function in the native library dynamically, the developer names the method and the function according to the specs such that the JNI system can dynamically do the linking.
According to the spec, the developer would name the function as follow for the system to be able to dynamically link the native method and function. A native method name is concatenated from the following components:
- the prefix Java_
- a mangled fully-qualified class name
- an underscore (“_”) separator
- a mangled method name
- for overloaded native methods, two underscores (“__”) followed by the mangled argument signature
In order to do dynamic linking for the Java-declared native method below and let’s say it’s in the class com.android.interesting.Stuff
public native String doThingsInNativeLibrary(int var0);
The function in the native library would need to be named:
Java_com_android_interesting_Stuff_doThingsInNativeLibrary
If there is not a function in the native library with that name, that means that the application must be doing static linking.
Static Linking
If the developer doesn’t want to or can not name the native functions according to the spec (Ex. wants to strip debug symbols), then they must use static linking with the RegisterNatives (doc) API in order to do the pairing between the Java-declared native method and the function in the native library. The RegisterNatives function is called from the native code, not the Java code and is most often called in the JNI_OnLoad function since RegisterNatives must be executed prior to calling the Java-declared native method.
jint RegisterNatives(JNIEnv *env, jclass clazz, const JNINativeMethod *methods, jint nMethods);

typedef struct {
    char *name;
    char *signature;
    void *fnPtr;
} JNINativeMethod;
When reverse engineering, if the application is using the static linking method, we as analysts can find the JNINativeMethod struct that is being passed to RegisterNatives in order to determine which subroutine in the native library is executed when the Java-declared native method is called.
The JNINativeMethod struct requires a string of the Java-declared native method name and a string of the method’s signature, so we should be able to find these in our native library.
Method Signature
The JNINativeMethod struct requires the method signature. A method signature states the types of the arguments that the method takes and the type of what it returns. This link documents JNI Type Signatures in the “Type Signatures” section.
- Z: boolean
- B: byte
- C: char
- S: short
- I: int
- J: long
- F: float
- D: double
- L fully-qualified-class ; :fully-qualified-class
- [ type: type[]
- ( arg-types ) ret-type: method type
- V: void
For the native method
public native String doThingsInNativeLibrary(int var0);
The type signature is
(I)Ljava/lang/String;
Here’s another example of a native method and its signature. For the following is the method declaration
public native long f (int n, String s, int[] arr);
It has the type signature:
(ILjava/lang/String;[I)J
Exercise #5 - Find the Address of the Native Function
In Exercise #5 we’re going to learn to load native libraries in a disassembler and identify the native function that is executed when a native method is called. For this particular exercise, the goal is not to reverse engineer the native method, just to find the link between the call to the native method in Java and the function that is executed in the native library. For this exercise, we will be using the sample Mediacode.apk. This sample is available at ~/samples/Mediacode.apk in the VM. Its SHA256 hash is a496b36cda66aaf24340941da8034bd53940d1b08d83a97f17a65ae144ebf91a.
Goal
The goal of this exercise is to:
- Identify declared native methods in the DEX bytecode
- Determine what native libraries are loaded (and thus where the native methods may be implemented)
- Extract the native library from the APK
- Load the native library into a disassembler
- Identify the address (or name) of the function in the native library that is executed when the native method is called
Instructions
- Open Mediacode.apk in jadx. Refer back to Exercise #1
- This time, if you expand the Resources tab, you will see that this APK has a
lib/directory. The native libraries for this APK are in the default CPU paths.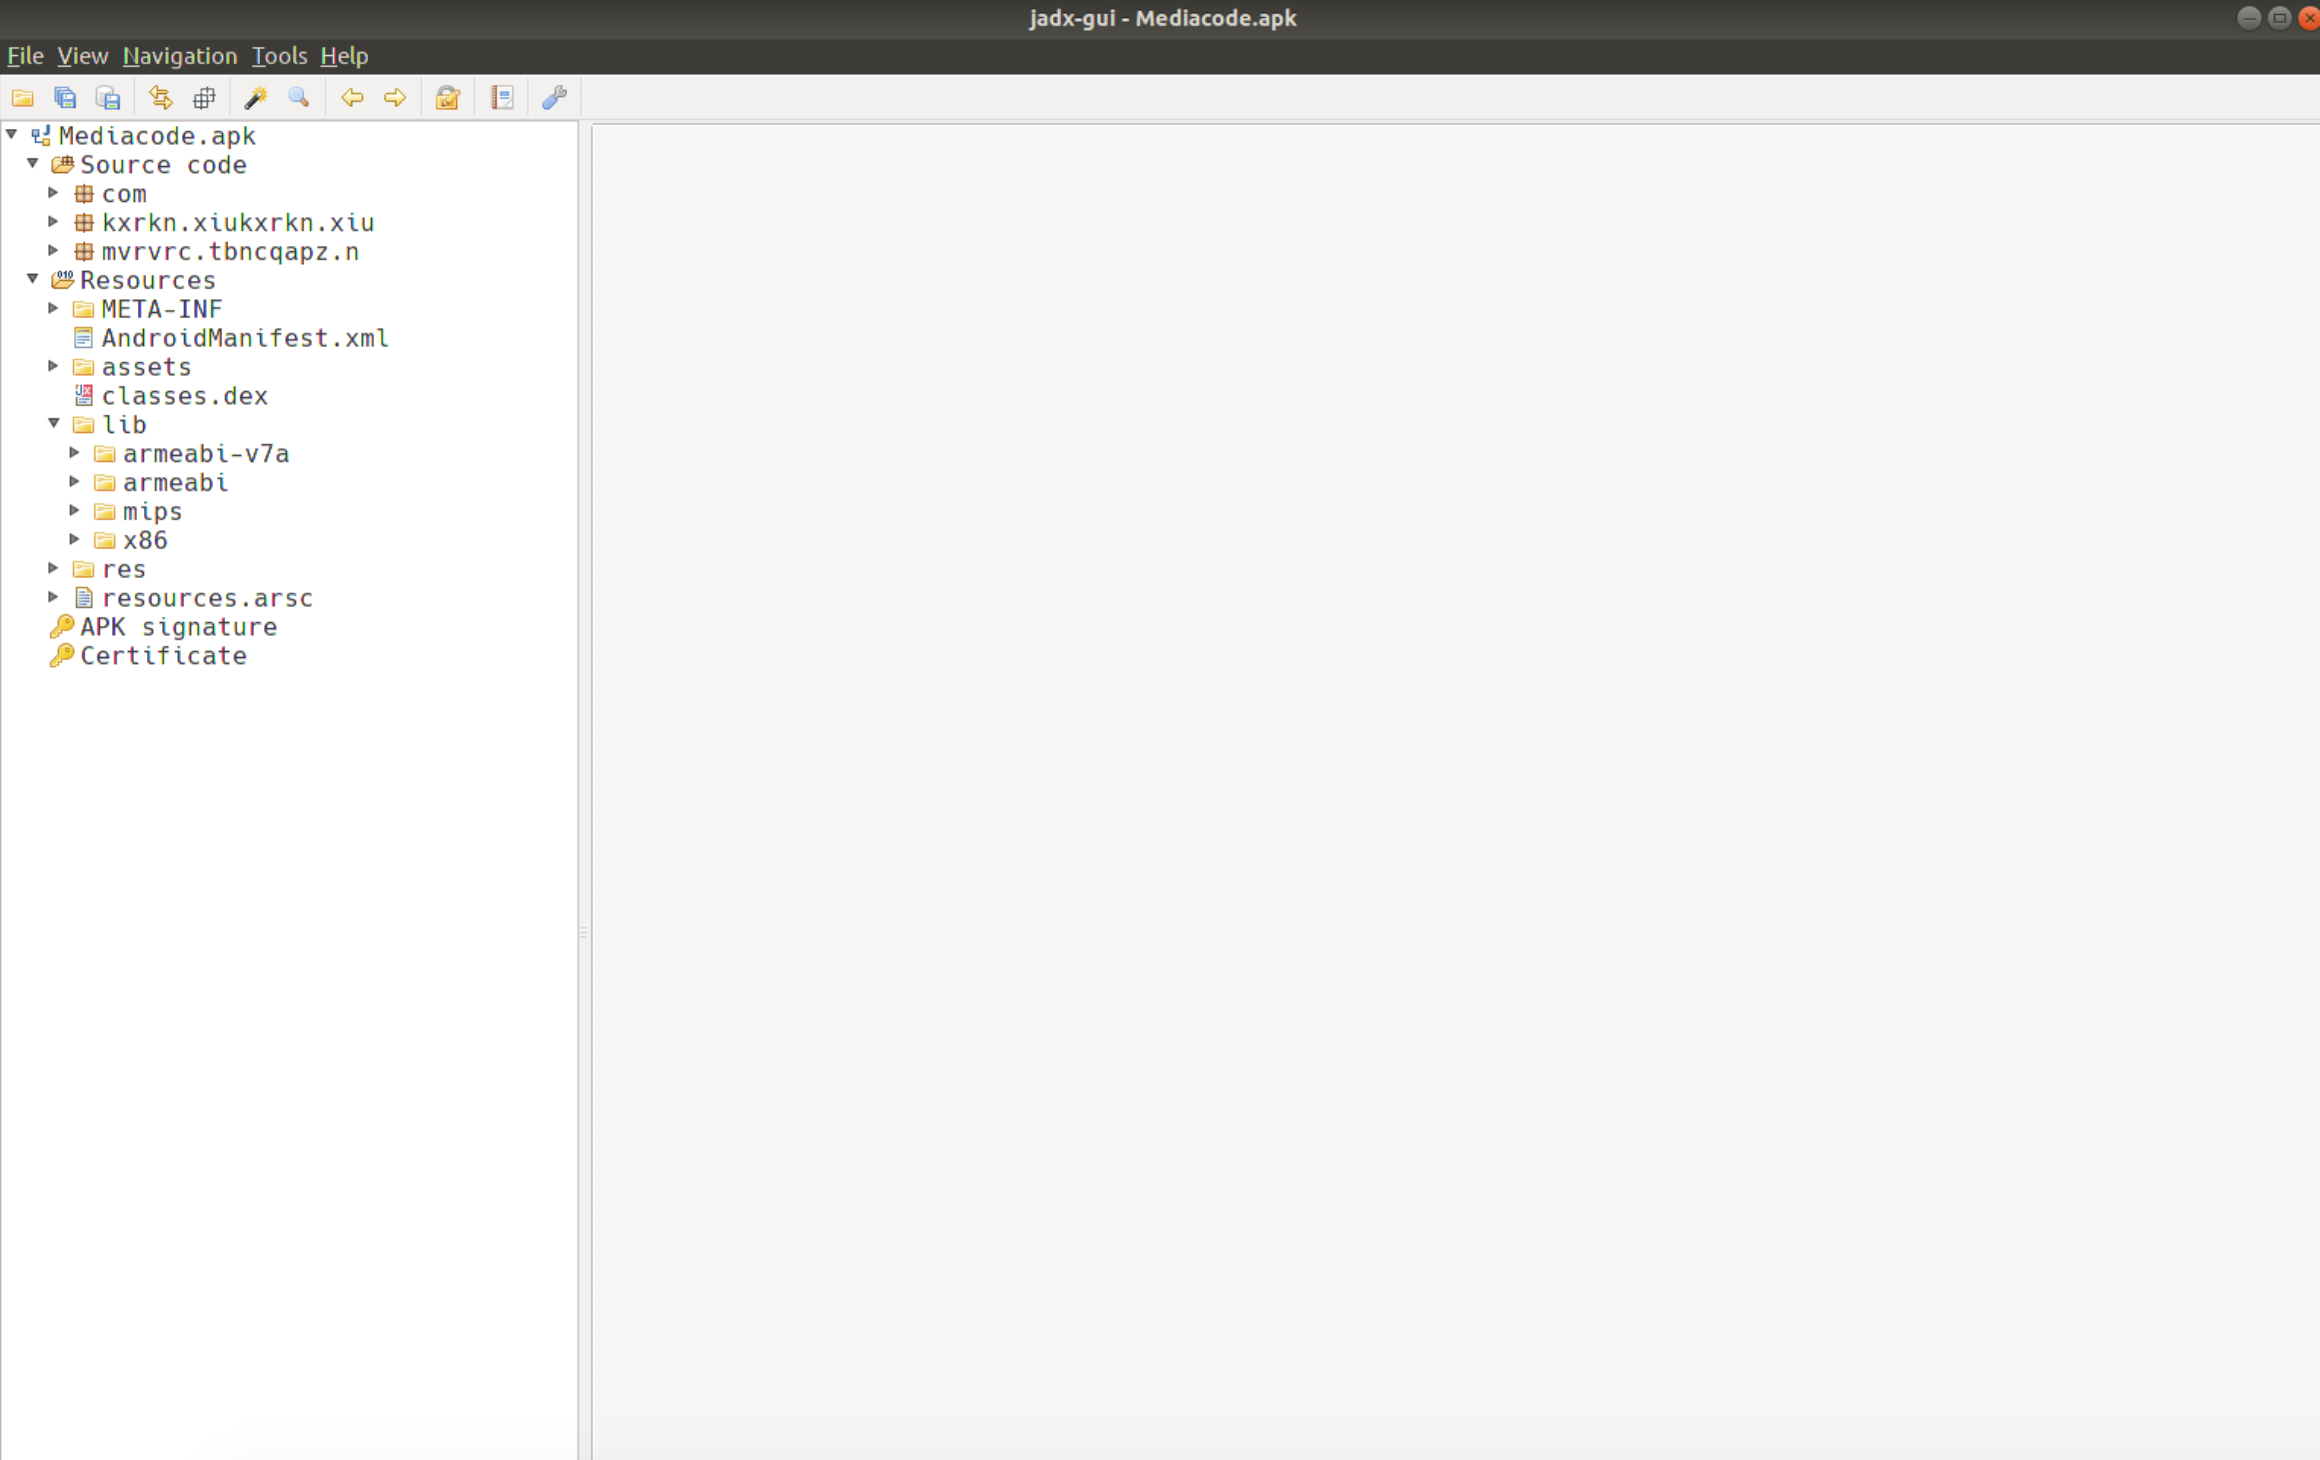
- Now we need to identify any declared native methods. In jadx, search and list all declared native methods. There should be two.
- Around the declared native method, see if there is anywhere that a native library is loaded. This will provide guidance of what native library to look in for the function to be implemented.
- Extract the native library from the APK by creating a new dir and copying the APK into that folder. Then run the command
unzip Mediacode.APK. You will see all of the files extracted from APK, which includes thelib/directory. - Select the architecture of the native library you’d like to analyze.
- Start ghidra by running
ghidraRun. This will open Ghidra. - To open the native library for analysis, select “New Project”, “Non-Shared Project”, select a path to save the project to and give it a name. This creates a project that you can then load binary files into.
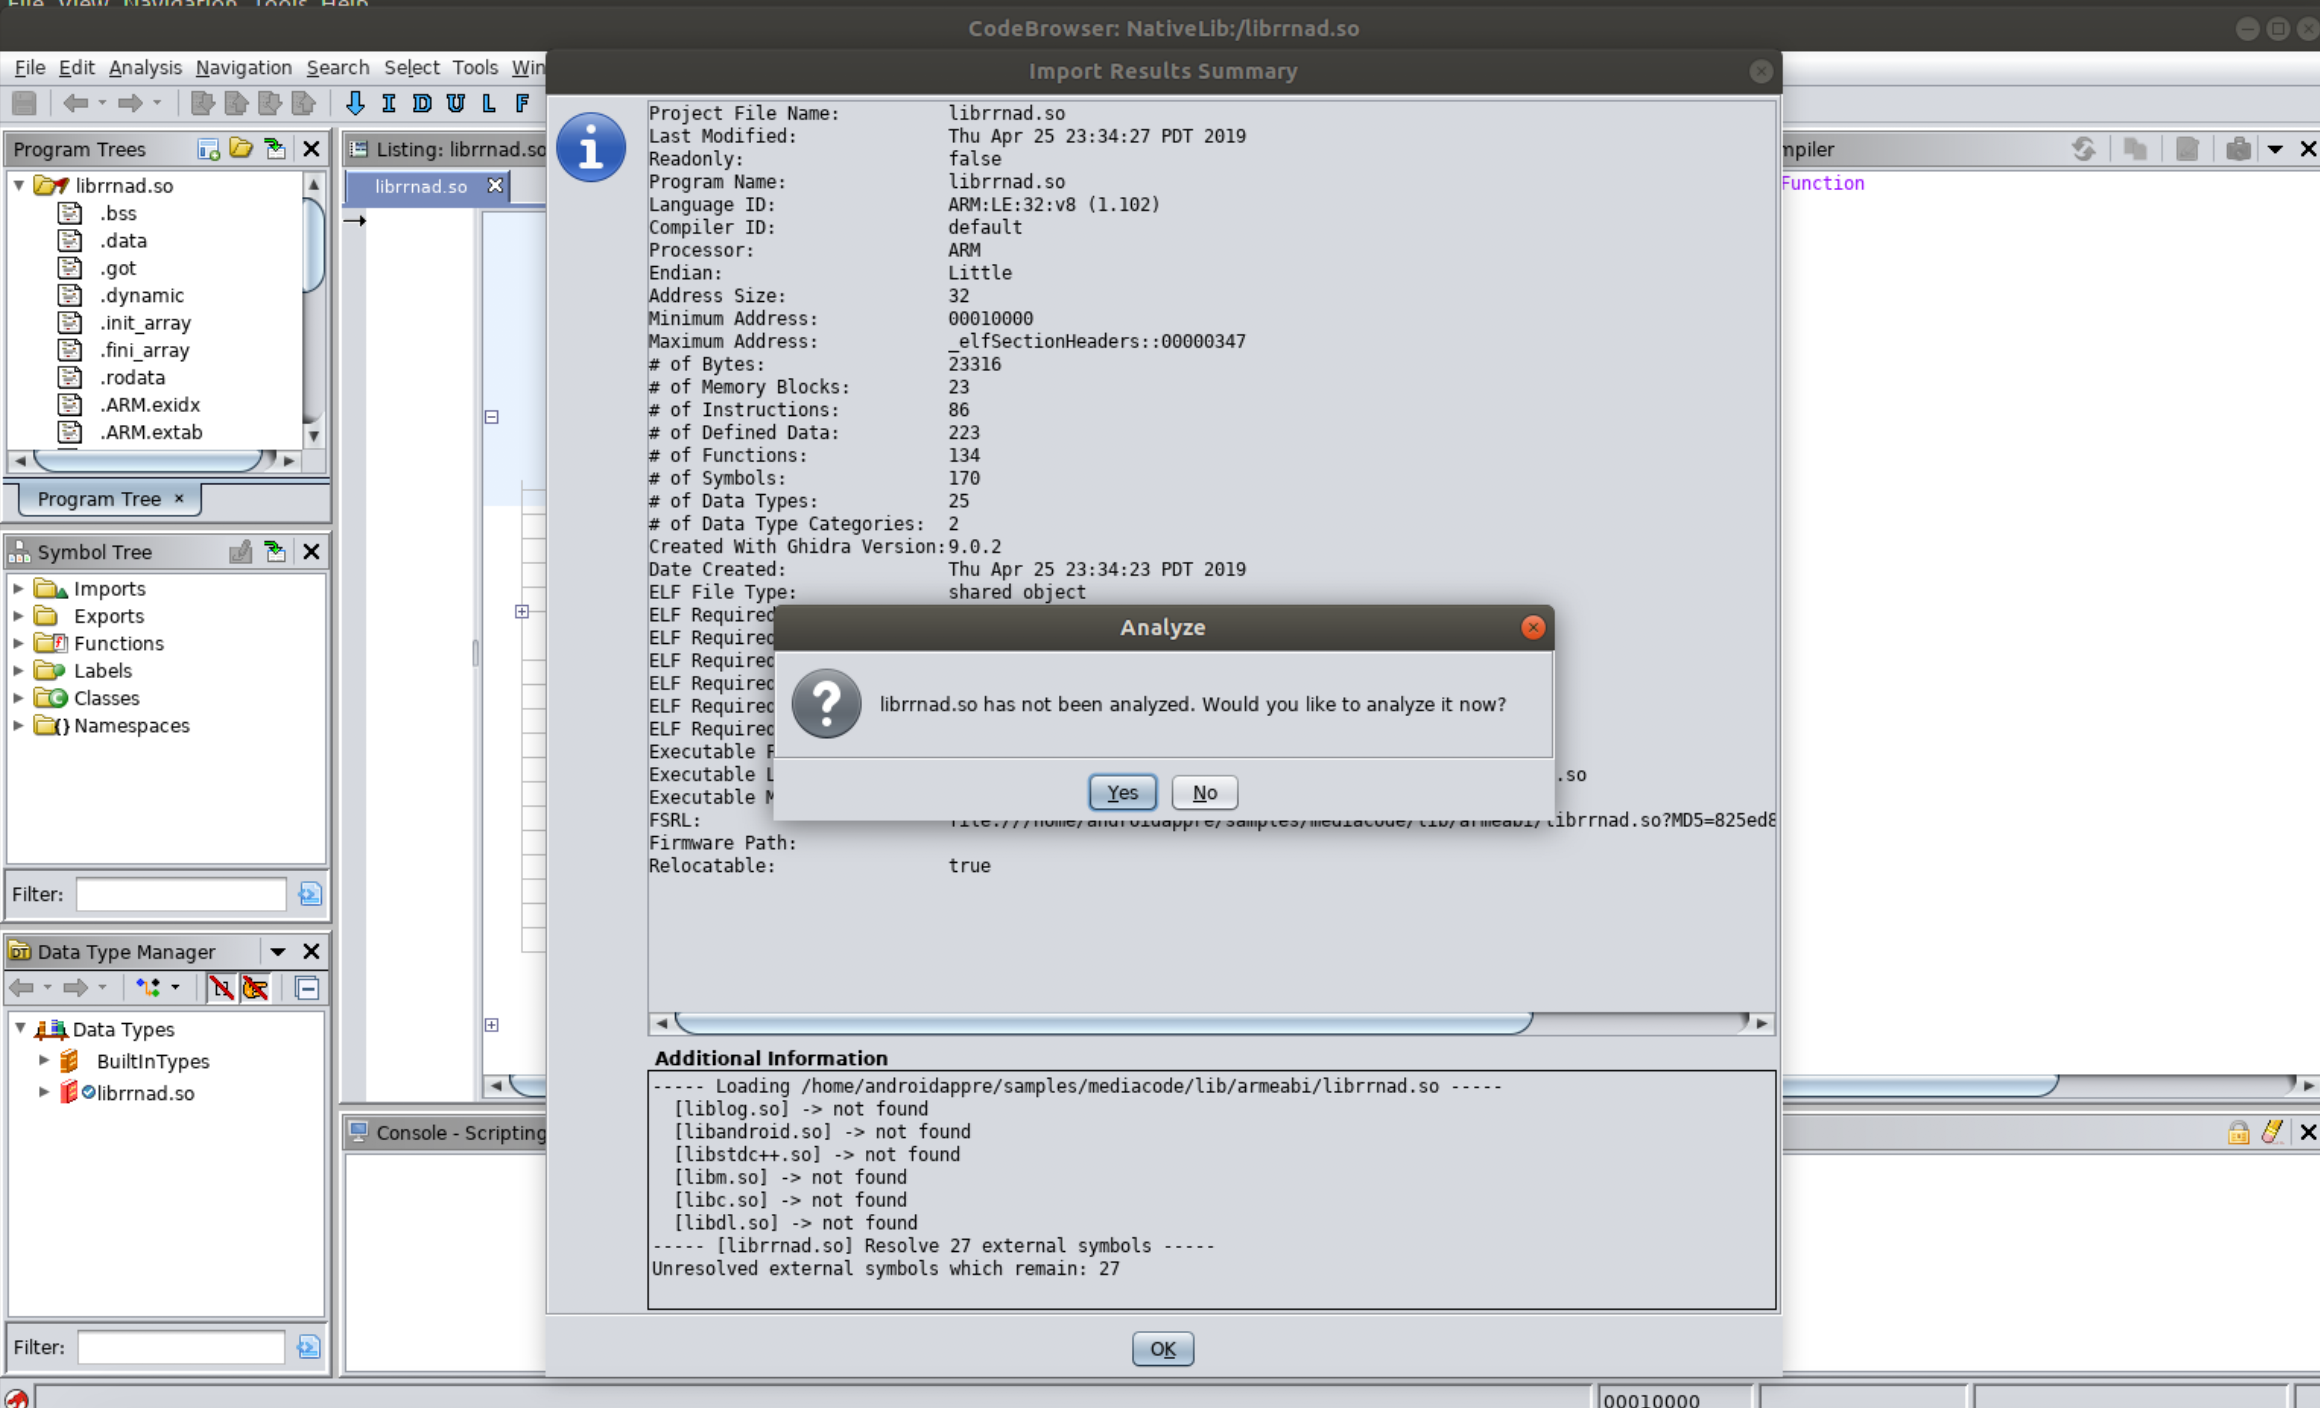
- Once you’ve created your project, select the dragon icon to open the Code Browser. The go to “File” > “Import File” to load the native library into the tool. You can leave all defaults.
- You will see the following screen. Select “Analyze”.
- Using the linking information above, identify the function in the native library that is executed when the Java-declared native method is called.
Solution
Reversing Android Native Libraries Code - JNIEnv
When beginning to reverse engineer Android native libraries, one of the things I didn’t know I needed to know, was about JNIEnv. JNIEnv is a struct of function pointers to JNI Functions. Every JNI function in Android native libraries, takes JNIEnv* as the first argument.
From the Android JNI Tips documentation:
The C declarations of JNIEnv and JavaVM are different from the C++ declarations. The “jni.h” include file provides different typedefs depending on whether it’s included into C or C++. For this reason it’s a bad idea to include JNIEnv arguments in header files included by both languages. (Put another way: if your header file requires #ifdef __cplusplus, you may have to do some extra work if anything in that header refers to JNIEnv.)
Here are some commonly used functions (and their offsets in JNIEnv):
- JNIEnv + 0x18: jclass (*FindClass)(JNIEnv, const char);
- JNIEnv + 0x34: jint (*Throw)(JNIEnv*, jthrowable);
- JNIEnv + 0x70: jobject (*NewObject)(JNIEnv*, jclass, jmethodID, …);
- JNIEnv + 0x84: jobject (*NewObject)(JNIEnv*, jclass, jmethodID, …);
- JNIEnv + 0x28C: jstring (*NewString)(JNIEnv, const jchar, jsize);
- JNIEnv + 0x35C: jint (*RegisterNatives)(JNIEnv, jclass, const JNINativeMethod, jint);
When analyzing Android native libraries, the presence of JNIEnv means that:
- For JNI native functions, the arguments will be shifted by 2. The first argument is always JNIEnv*. The second argument will be the object that the function should be run on. For static native methods (they have the static keyword in the Java declaration) this will be NULL.
- You will often see indirect branches in the disassembly because the code is adding the offset to the JNIEnv* pointer, dereferencing to get the function pointer at that location, then branching to the function.
Here is a spreadsheet of the C-implementation of the JNIEnv struct to know what function pointers are at the different offsets.
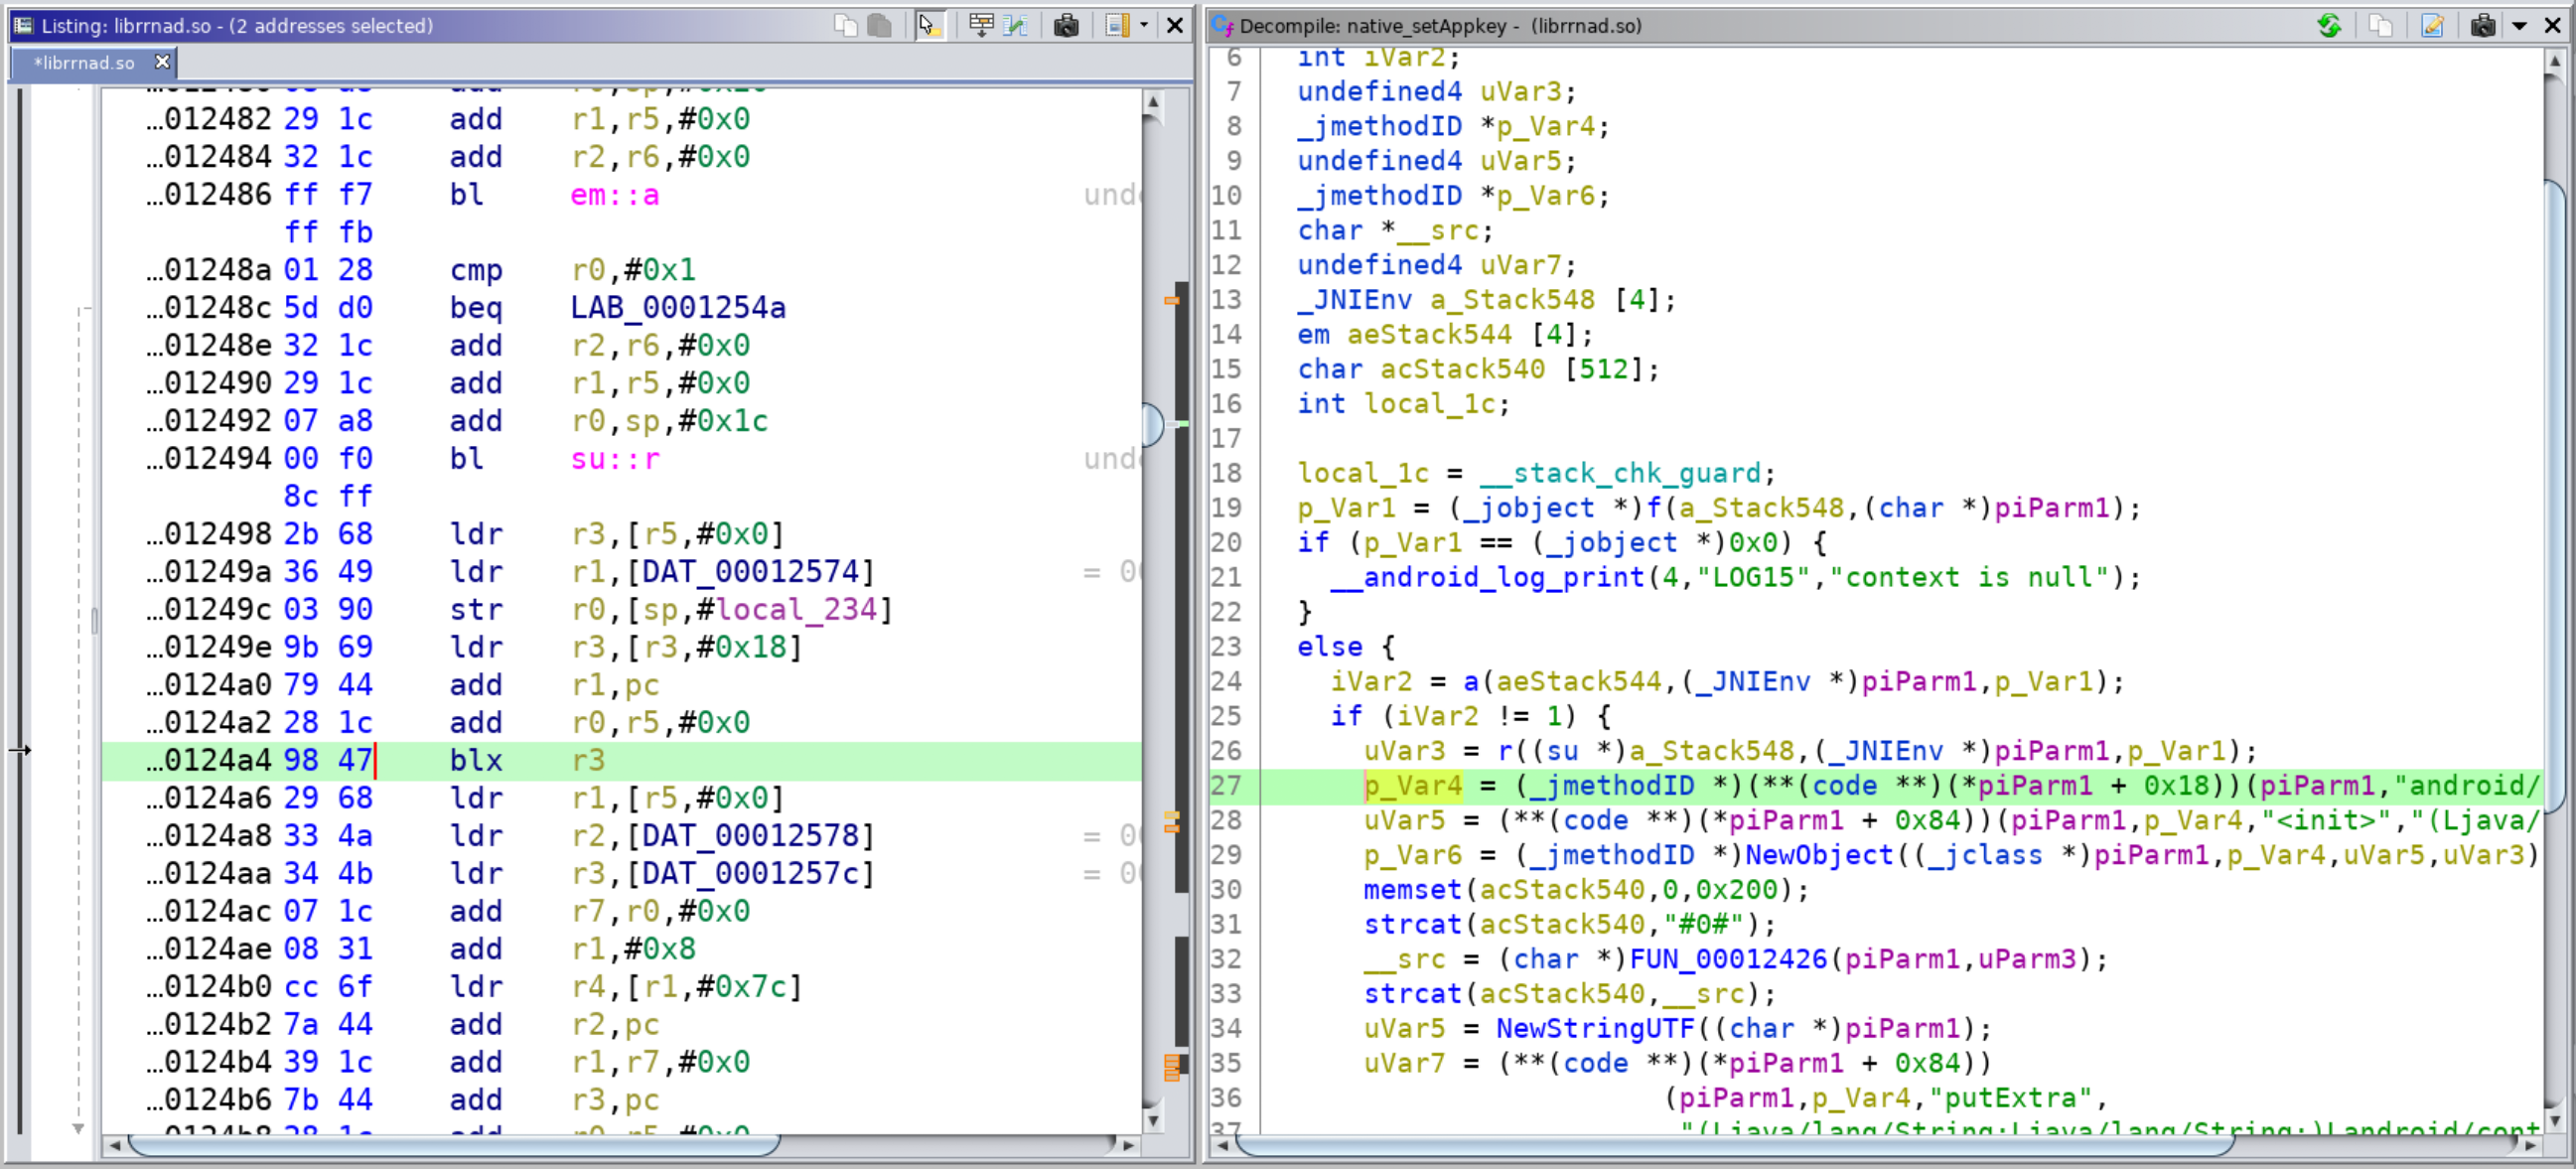
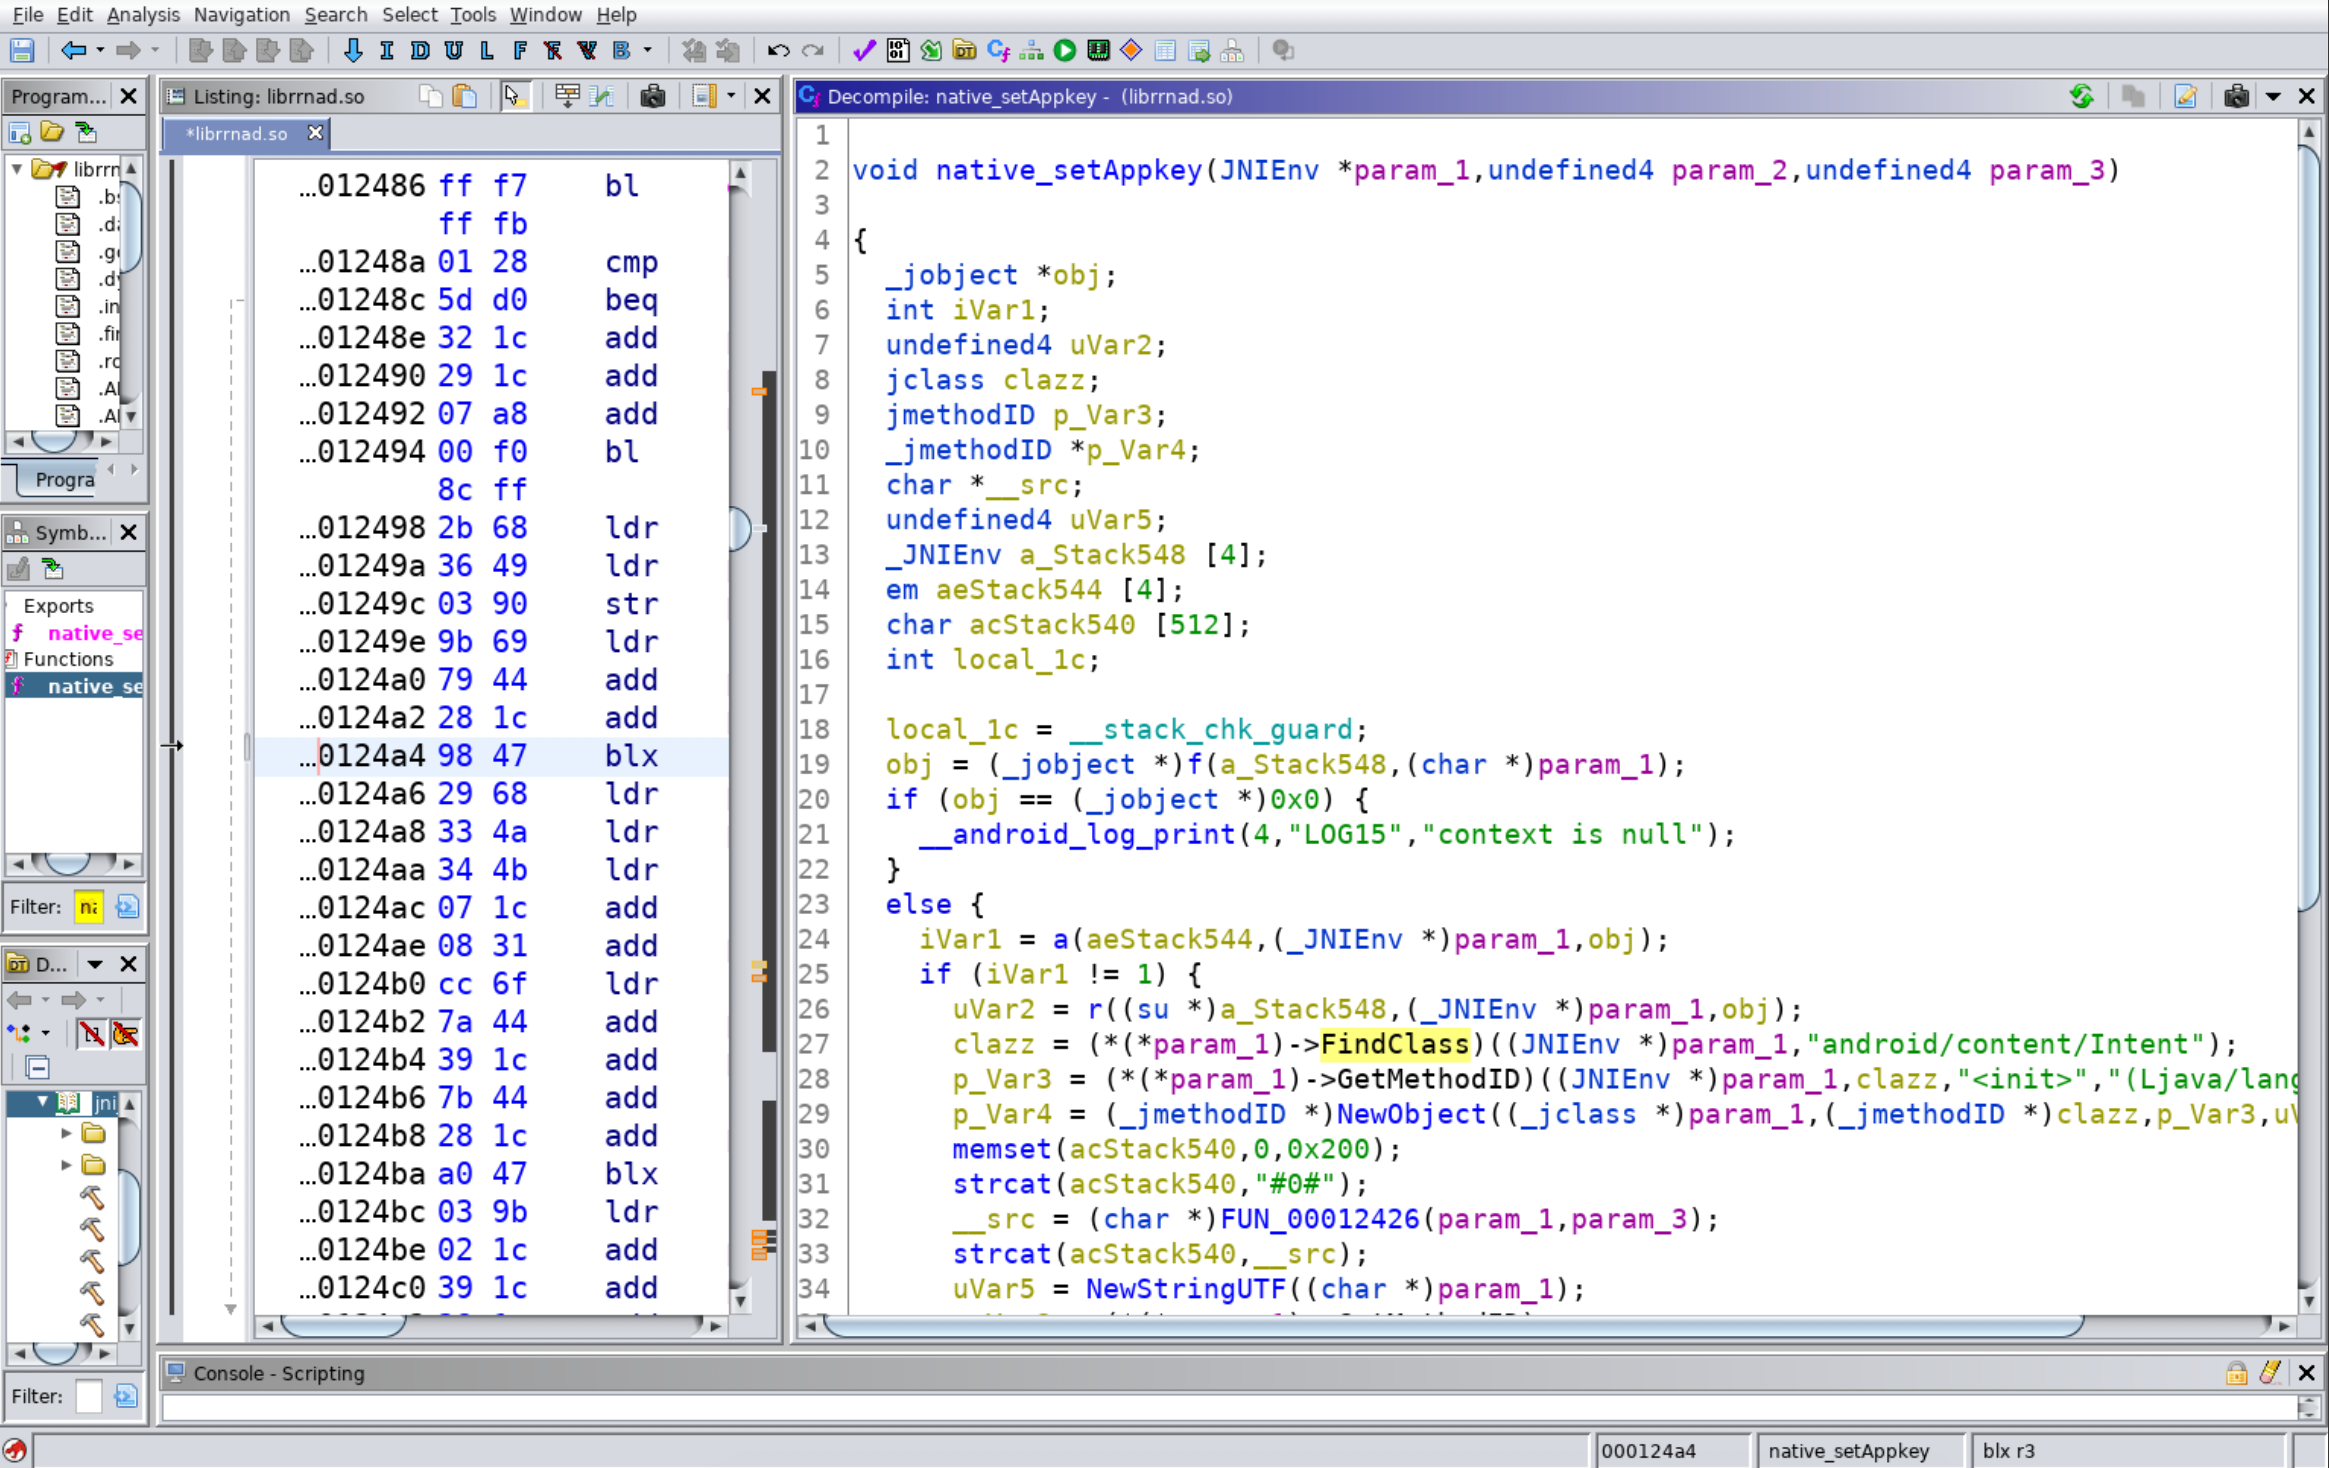
In practice, in the disassembly this shows as many different branches to indirect addresses rather than the direct function call. The image below shows one of these indirect function calls. The highlighted line in the disassembly shows a blx r3. As reversers, we need to figure out what r3 is. It’s not shown in the screenshot, but at the beginning of this function, r0 was moved into r5. Therefore, r5 is JNIEnv*. On line 0x12498 we see r3 = [r5]. Now r3 is JNIEnv (no *).
On line 0x1249e, we add 0x18 to r3 and dereference it. This means that r3 now equals whatever function pointer is at offset 0x18 in JNIEnv. We can find out by looking at the spreadsheet. [JNIEnv + 0x18] = Pointer to the FindClass method
Therefore blx r3 on line 0x124a4 is calling FindClass. We can look up information about FindClass (and all the other functions in JNIEnv) in the JNIFunctions documentation here.
Thankfully, there’s a way to get the JNI function without doing all of this manually! In both the Ghidra and IDA Pro decompilers you can re-type the first argument in JNI functions to JNIEnv * type and it will automatically identify the JNI Functions being called. In IDA Pro, this work out of the box. In Ghidra, you have to load the JNI types (either the jni.h file or a Ghidra Data Types archive of the jni.h file) first. For ease, we will load the JNI types from the Ghidra Data Types archive (gdt) produced by Ayrx and available here. For ease, this file is available in the VM at ~/jni_all.gdt.
To load it for use in Ghidra, in the Data Type Manager Window, click on the down arrow in the right-hand corner and select “Open File Archive”.

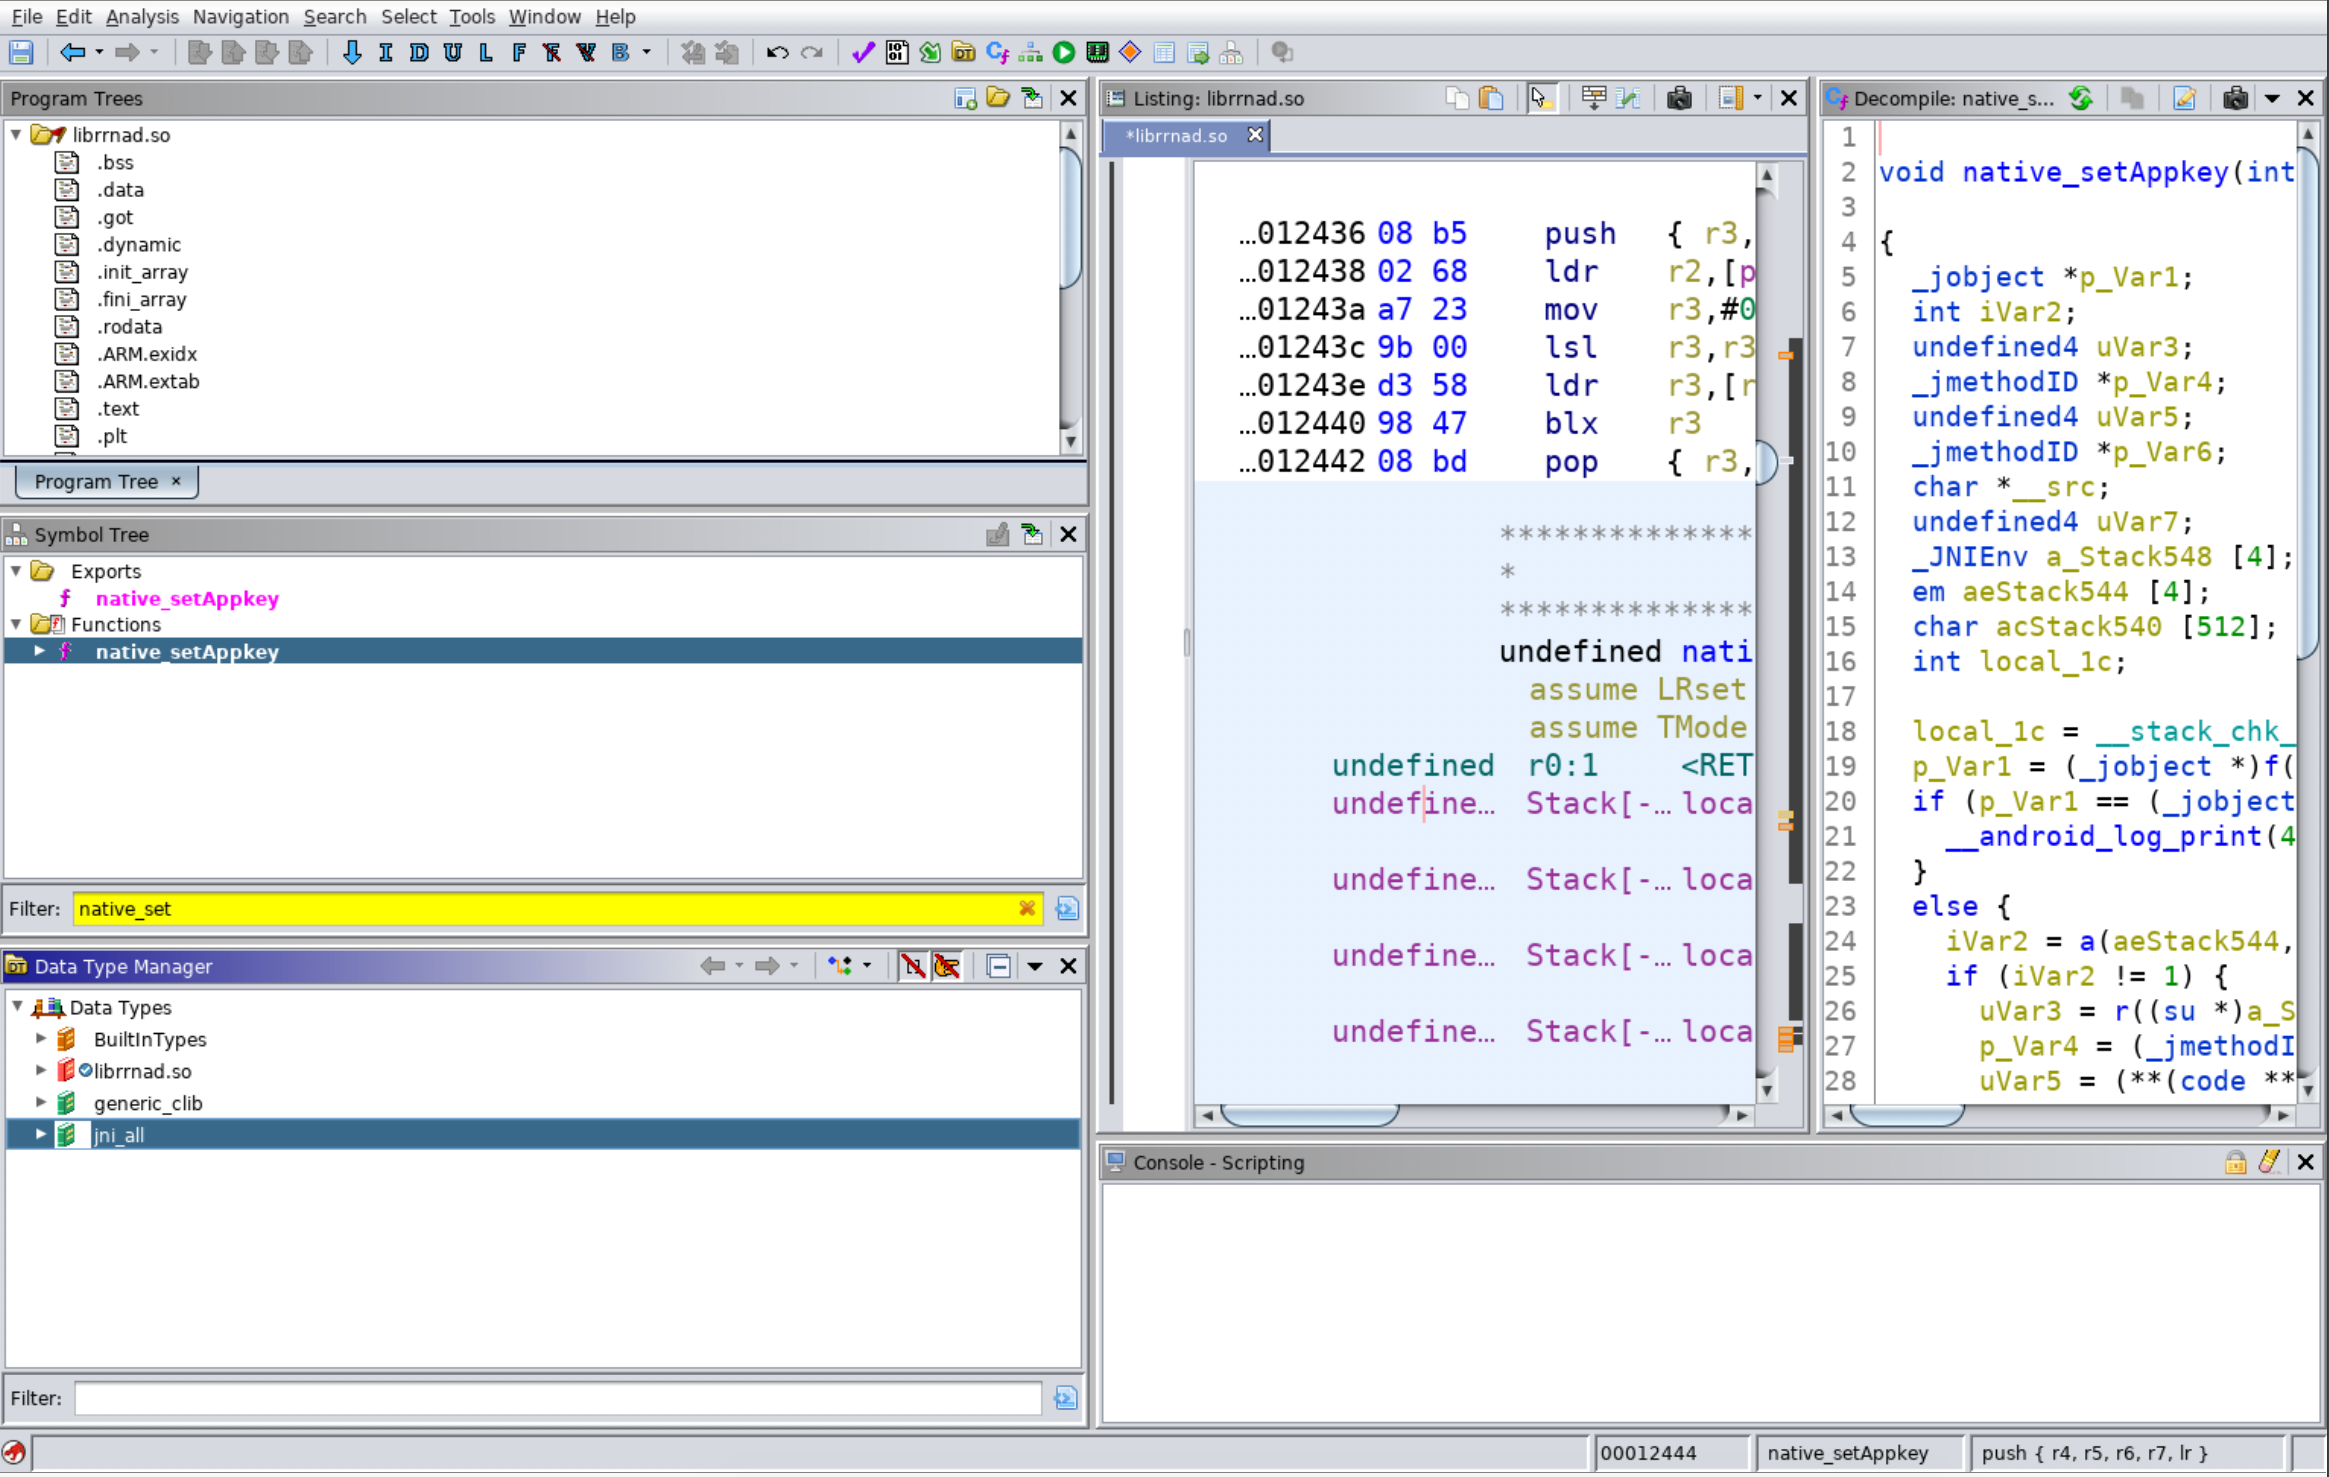
Then select jni_all.gdt file to load. Once it’s loaded, you should see jni_all in the Data Type Manager List as shown below.
Once this is loaded in Ghidra, you can then select any argument types in the decompiler and select “Retype Variable”. Set the new type to JNIEnv *. This will cause the decompiler to now show the names of the JNIFunctions called rather than the offsets from the pointer.
Exercise #6 - Find and Reverse the Native Function
We are going to point all of our previous skills together: identifying starting points for RE, reversing DEX, and reversing native code to analyze an application that may have moved its harmful behaviors in native code. The sample is ~/samples/HDWallpaper.apk.
Goal
The goal of this exercise is to put all of our Android reversing skills together to analyze an app as a whole: its DEX and native code.
Exercise Context
You are a malware analyst for Android applications. You are concerned that this sample maybe doing premium SMS fraud, meaning that it sends an SMS to a premium phone number without disclosure & user consent. In order to flag as malware, you need to determine if the Android application is:
- Sending an SMS message, and
- That SMS message is going to a premium number, and
- If there is an obvious disclosure, and
- If the SMS message is only sent to the premium number after user consent.
Instructions
Go on and reverse!